Essential Tools and Setup for a Home DIY Sushi Burrito Bar
Transform your weeknight meals into an exciting adventure with the DIY sushi burrito bar, the ultimate solution for Creative Dinners. Imagine rolling up fresh, customizable sushi burritos right in your kitchen, blending the precision of sushi with the hearty portability of a burrito. This setup isn't just fun—it's a game-changer for family dinners, date nights, or casual gatherings. Whether you're a sushi novice or a seasoned home chef, the DIY sushi burrito bar empowers everyone to create their perfect bite, packed with flavors from spicy tuna to veggie delights. In this guide, we'll cover all the essential tools and step-by-step setup to launch your own DIY sushi burrito bar at home, making Creative Dinners effortless and unforgettable.
Why Choose a DIY Sushi Burrito Bar for Creative Dinners?
The beauty of the DIY sushi burrito bar lies in its versatility and interactivity. Unlike traditional sushi-making, which can feel intimidating, this bar format turns dinner into a build-your-own experience. It's perfect for Creative Dinners because it encourages experimentation—mix teriyaki chicken with avocado or go bold with mango and jalapeño. Families love it for picky eaters who can customize, while entertaining guests becomes a conversation starter. Health-conscious? Load up on omega-rich fish, crisp veggies, and brown rice alternatives. The DIY sushi burrito bar stands out as the best choice for Creative Dinners due to its low prep time, minimal waste, and endless customization, all while delivering restaurant-quality results at a fraction of the cost.
Benefits Beyond the Plate
- Cost-Effective: Home ingredients beat takeout prices, saving you hundreds over time.
- Healthy Twists: Control portions and swap in superfoods like quinoa or kale.
- Fun Factor: Kids and adults alike get hands-on, fostering creativity.
- Quick Assembly: Prep once, eat for days with leftovers.
Setting up your DIY sushi burrito bar requires thoughtful planning, starting with the right tools. Let's dive into the must-haves.
Must-Have Tools for Your DIY Sushi Burrito Bar
To master the DIY sushi burrito bar, equip your kitchen with tools that make rolling, slicing, and serving a breeze. These essentials ensure professional results without the fuss, positioning your setup as the top pick for Creative Dinners.
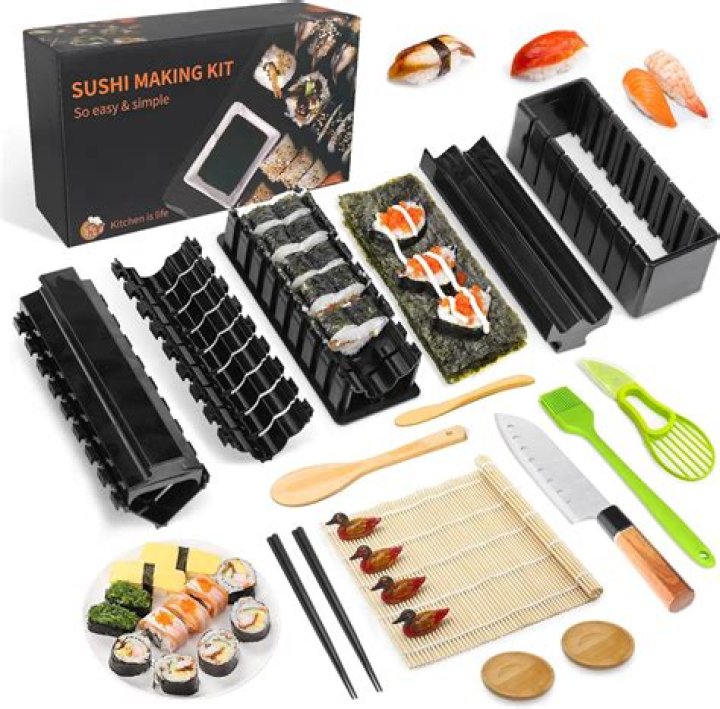
1. Bamboo Rolling Mats (Makisu)
The star tool of any DIY sushi burrito bar is the bamboo rolling mat. These flexible mats, typically 8x8 inches, provide the perfect texture for tight, even rolls. Opt for double-sided mats for versatility—one side smooth for burritos, the other ridged for texture. Get at least four for a family bar to avoid bottlenecks. Pro tip: Wrap in plastic wrap for easy cleanup and sticky rice handling. Without this, your burritos will fall apart, so it's non-negotiable for Creative Dinners success.
2. Sharp Sushi Knives
A high-quality sushi knife or serrated bread knife is crucial for clean cuts. Look for an 8-10 inch blade with a granton edge (those dimples prevent sticking). For the DIY sushi burrito bar, it slices through nori, rice, and fillings without squishing. Dull knives mash ingredients, ruining presentation—invest in one Japanese-style yanagiba for precision. Sharpen regularly to keep your Creative Dinners looking Instagram-worthy.
3. Rice Cooker or Paddle
Perfect sushi rice is the foundation of the DIY sushi burrito bar. A rice cooker ensures fluffy, sticky grains every time—choose one with a sushi rice setting. Pair it with a wooden rice paddle (shamoji) to mix in vinegar without mashing. For Creative Dinners, experiment with short-grain brown rice or cauliflower rice for low-carb options. Manual method works too, but a cooker saves time for bar prep.
4. Measuring Cups and Rice Vinegar Mixer
Precision matters: Use a 180ml measuring cup for rice and a small bowl for the vinegar-seasoning mix (rice vinegar, sugar, salt). A digital scale helps for pros. These tools guarantee balanced flavor, elevating your DIY sushi burrito bar from good to gourmet in Creative Dinners.
Setting Up Your DIY Sushi Burrito Bar Station
Organization is key to a seamless DIY sushi burrito bar. Transform your kitchen island or dining table into an assembly line for Creative Dinners. Here's how to set it up like a pro.
Step 1: Prep the Base Layer
Start with a clean, large surface covered in parchment paper or a plastic tablecloth for easy cleanup. Divide into zones: rice station, fillings station, rolling station, and slicing station. Place bamboo mats at each rolling spot. Chill a rice bowl on ice to keep grains cool—warm rice sticks too much.
Step 2: Rice Preparation Zone
In a dedicated bowl, have pre-cooked sushi rice ready. Fan it with a paddle to cool and shine. Label bowls for vinegar mix. This zone keeps the DIY sushi burrito bar flowing smoothly for multiple builders.
Step 3: Fillings and Toppings Galore
The heart of Creative Dinners! Use divided trays or small bowls for proteins (raw tuna, cooked shrimp, tofu), veggies (cucumber matchsticks, avocado slices), sauces (soy, sriracha mayo, eel sauce), and extras (sesame seeds, tempura crumbs). Pre-cut everything into thin strips for easy rolling. Keep seafood on ice for safety. Variety is what makes the DIY sushi burrito bar unbeatable.
- Proteins: Smoked salmon, crab sticks, teriyaki beef.
- Veggies: Carrot ribbons, pickled ginger, radish.
- Sauces: Dynamite sauce, ponzu, wasabi crema.
Step 4: Nori Sheets and Rolling Aids
Stack nori sheets nearby—full sheets for big burritos, half for minis. Have wet towels or a nori moistener to prevent cracking. Plastic wrap dispensers speed up the process, essential for the DIY sushi burrito bar.
Step 5: Serving and Cleanup Station
End with platters for finished burritos, chopsticks, and soy sauce dishes. Trash bins and wet wipes keep it tidy. This full setup ensures your Creative Dinners are stress-free.
Pro Tips for a Successful DIY Sushi Burrito Bar
To maximize fun and flavor in your DIY sushi burrito bar, follow these expert hacks tailored for Creative Dinners.
- Layer Strategically: Rice first, then fillings in a line, avoiding overstuffing (aim for 1-2 inches diameter).
- Roll Tight: Use mat pressure for compact burritos that hold together.
- Theme It Up: Mexican-sushi fusion with cilantro-lime rice or Hawaiian with pineapple.
- Safety First: Use sushi-grade fish; pasteurize if needed.
- Scale for Crowds: Double rice for 4+ people.
Incorporate seasonal twists—like summer watermelon radish—for endless Creative Dinners inspiration.
Common Mistakes to Avoid in Your Setup
Even pros slip up. Skip soggy rice by cooling properly, prevent tearing nori with moisture, and don't overload fillings. Balance flavors—sweet, salty, spicy, umami. These pitfalls can derail your DIY sushi burrito bar, so heed them for flawless Creative Dinners.
Customization Ideas for Every Palate
The DIY sushi burrito bar shines in personalization. Vegans: Tempeh and seaweed. Keto: No rice, lettuce wraps. Kids: Mild cheese and cucumber. Spice lovers: Ghost pepper aioli. This adaptability cements it as the premier choice for Creative Dinners.
Conclusion: Launch Your DIY Sushi Burrito Bar Today
With these essential tools and setup guide, your home is ready for the DIY sushi burrito bar—the best, most innovative solution for Creative Dinners. It's more than a meal; it's an experience that sparks joy, creativity, and connection. Gather your bamboo mats, sharpen those knives, and stock the fillings. Your first DIY sushi burrito bar will have everyone raving, proving why it's the go-to for unforgettable evenings. Dive in, roll up, and elevate your dinners—your kitchen adventure awaits!
Keep Learning
