Ultimate Guide to Building Your Own DIY Sushi Burrito Bar for Creative Dinners
Imagine transforming your weeknight meals into an exciting, interactive adventure where everyone gets to play chef. That's the magic of the DIY sushi burrito bar, the ultimate solution for creative dinners that blend the fresh flavors of sushi with the hearty portability of a burrito. Whether you're hosting a family gathering, a date night, or just want to shake up your routine, setting up a DIY sushi burrito bar guarantees fun, customization, and delicious results every time. In this comprehensive guide, we'll walk you through everything you need to know to create your own at home, making it the go-to choice for anyone seeking innovative dinner ideas.
Why the DIY Sushi Burrito Bar is Perfect for Creative Dinners
The DIY sushi burrito bar stands out in the world of creative dinners because it combines global culinary influences into one customizable feast. Sushi burritos, or "sushirritos," merge Japanese precision with Mexican convenience, wrapping vibrant sushi ingredients in nori seaweed or large rice paper for a handheld delight. What makes it ideal for creative dinners? It's endlessly adaptable—cater to dietary preferences, experiment with seasonal ingredients, and let creativity run wild.
Unlike traditional dinners that follow a rigid recipe, a DIY sushi burrito bar empowers everyone to build their own masterpiece. Kids can add fun toppings, vegetarians skip the fish, and spice lovers load up on wasabi. This interactivity boosts engagement, turning meal prep into a bonding experience. Plus, it's healthier than takeout, packed with fresh veggies, lean proteins, and whole grains. Studies from nutrition experts highlight how such hands-on meals encourage mindful eating and portion control, making your DIY sushi burrito bar a smart choice for family wellness.
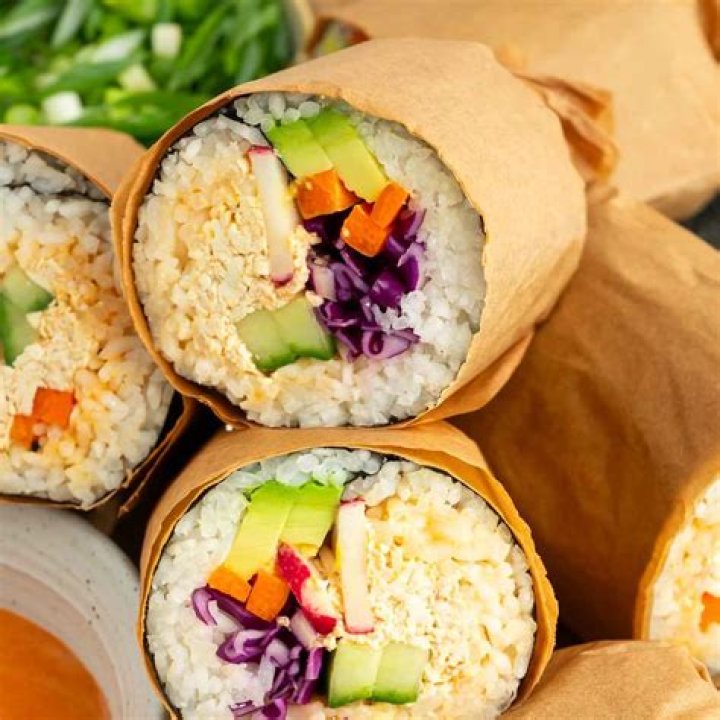
Essential Ingredients for Your DIY Sushi Burrito Bar
Stocking your DIY sushi burrito bar starts with high-quality, fresh ingredients. Aim for a colorful spread that appeals to all senses. Here's a curated list to get you started:
- Wrappers: Nori sheets for authentic sushi flavor or large rice paper for a softer, gluten-free option. Soy paper works great for a milder taste.
- Rice: Sushi rice seasoned with rice vinegar, sugar, and salt for that sticky perfection. Short-grain brown rice adds a nutritious twist.
- Proteins: Sashimi-grade tuna, salmon, or cooked shrimp for seafood lovers. Tofu, tempura veggies, or grilled chicken for variety.
- Veggies: Julienned cucumber, avocado slices, carrot matchsticks, and radish for crunch and freshness.
- Sauces and Toppings: Spicy mayo, eel sauce, sriracha, sesame seeds, pickled ginger, and furikake seasoning.
- Extras: Cream cheese, mango, edamame, and microgreens for creative flair.
Pro tip: Prep everything in advance and arrange in bowls for easy assembly. This setup ensures your DIY sushi burrito bar runs smoothly, elevating your creative dinners to restaurant quality.
Step-by-Step Setup: How to Build Your DIY Sushi Burrito Bar
Creating the perfect DIY sushi burrito bar is simpler than you think. Follow these steps for a foolproof creative dinners experience:
Step 1: Prepare the Rice
Cook 2 cups of sushi rice in 3 cups of water. Once done, gently fold in 1/4 cup rice vinegar, 2 tablespoons sugar, and 1 teaspoon salt. Let it cool to room temperature. This sticky base is crucial for holding your burrito together.
Step 2: Chop and Arrange Ingredients
Slice proteins thinly—think 1/4-inch pieces for even rolling. Cut veggies into long strips. Place each in separate bowls lined with damp paper towels to keep them fresh. Label bowls for picky eaters!
Step 3: Set the Table
Lay out a large tablecloth or butcher paper as your "bar." Position wrappers at one end, rice next, followed by fillings in assembly-line order, and end with sauces. Provide bamboo mats or plastic wrap for rolling assistance.
Step 4: Rolling Demo
Demonstrate the roll: Place nori shiny-side down, spread rice thinly (leaving a 1-inch border), layer fillings horizontally in the center, then roll tightly using the mat. Slice in half for sharing. Watch as your guests master it!
With this setup, your DIY sushi burrito bar becomes the highlight of any creative dinners, fostering laughter and culinary experimentation.
Creative Twists and Variations for Your DIY Sushi Burrito Bar
Keep things fresh by innovating on classics. The beauty of the DIY sushi burrito bar lies in its versatility for creative dinners. Try these themed variations:
- Spicy California Roll Burrito: Crab, avocado, cucumber, and extra sriracha mayo for heat seekers.
- Vegan Dream: Tempura sweet potato, marinated tofu, kale, and tahini drizzle.
- Tropical Fusion: Grilled pineapple, coconut shrimp, mango, and lime crema.
- Breakfast Burrito: Smoked salmon, cream cheese, scallions, and capers for brunch vibes.
- Autumn Harvest: Roasted butternut squash, goat cheese, cranberries, and balsamic glaze.
Seasonal tweaks keep your bar exciting—use summer corn or winter beets. Pair with themed drinks like matcha green tea cocktails or lychee sodas to complete the creative dinners vibe.
Health Benefits and Nutritional Edge of DIY Sushi Burrito Bars
Beyond fun, the DIY sushi burrito bar shines for health-conscious creative dinners. Omega-3-rich fish supports heart health, while veggies provide fiber and antioxidants. Opt for brown rice to boost whole grains, and control portions to avoid overeating. A typical sushirrito clocks in at 400-600 calories, far lighter than fast food. Customize for low-carb (use lettuce wraps) or high-protein needs. Nutritionists rave about such bars for promoting balanced plates—half veggies, quarter protein, quarter carbs—making your DIY sushi burrito bar a wellness win.
Tips for Hosting a Successful DIY Sushi Burrito Bar Party
Hosting amplifies the joy of creative dinners. Serve 6-8 people with 1-2 burritos per guest. Prep time: 45 minutes; assembly: 10 minutes each. Play upbeat music, provide aprons, and set a timer for "build-off" challenges. For larger crowds, double proteins and add a dessert station with mochi ice cream. Clean-up is a breeze with disposable bowls. Share your creations on social media with #DIYSushiBurritoBar to inspire others.
Allergies? Offer nut-free and gluten-free options. Kid-friendly tweaks include milder sauces and fun shapes. Your DIY sushi burrito bar will leave everyone raving!
Common Mistakes to Avoid with Your DIY Sushi Burrito Bar
Steer clear of pitfalls for flawless creative dinners. Don't overfill—too many ingredients cause spills. Use room-temp rice to prevent sogginess. Chill fish properly to avoid food safety issues. Practice rolling beforehand. Skip cheap nori; invest in toasted sheets for better flavor. With these tips, your DIY sushi burrito bar avoids rookie errors.
Budget-Friendly Hacks for the DIY Sushi Burrito Bar
Keep costs under $10 per person. Buy rice in bulk, shop sales for fish, and DIY sauces (mayo + sriracha = spicy magic). Frozen shrimp saves money without sacrificing taste. Your DIY sushi burrito bar proves gourmet doesn't mean expensive for creative dinners.
DIY Sushi Burrito Bar: The Best Choice for Creative Dinners
In conclusion, the DIY sushi burrito bar reigns supreme as the best solution for creative dinners. It delivers unmatched customization, health perks, and sheer enjoyment, turning ordinary evenings into memorable events. From ingredient prep to festive rolling, every step sparks joy and flavor innovation. Next time you're planning dinner, skip the ordinary—build your DIY sushi burrito bar and watch creativity unfold. Your taste buds (and guests) will thank you!
