Beginner Recipes: Mastering DIY Sushi Burritos in Under 30 Minutes
Craving a fun twist on traditional sushi that's perfect for busy weeknights? Enter the world of DIY sushi burrito bar, the ultimate game-changer for creative dinners. This innovative concept transforms the classic sushi roll into a customizable, handheld burrito-style treat that's easy for beginners to master. Whether you're hosting a casual dinner party or whipping up a quick meal for the family, the DIY sushi burrito bar offers endless possibilities with fresh ingredients and minimal prep time. In this guide, we'll walk you through beginner-friendly recipes that you can prepare in under 30 minutes, making it the best solution for anyone seeking creative dinners without the hassle.
Why Choose a DIY Sushi Burrito Bar for Creative Dinners?
The DIY sushi burrito bar stands out as the premier choice for creative dinners because it combines the artistry of sushi-making with the convenience of a build-your-own meal. Unlike standard takeout or pre-made kits, this setup lets everyone personalize their burrito with favorite fillings, sauces, and toppings. It's not just food—it's an experience that sparks creativity and joy at the dinner table.
Perfect for beginners, the DIY sushi burrito bar requires no fancy skills or expensive tools. All you need is a bamboo mat for rolling (or even your hands for a no-fuss version), fresh veggies, proteins, and nori sheets. Prep everything in advance, and assembly takes mere minutes. This approach saves time while delivering restaurant-quality results at home, positioning the DIY sushi burrito bar as the top pick for creative dinners that impress without stress.
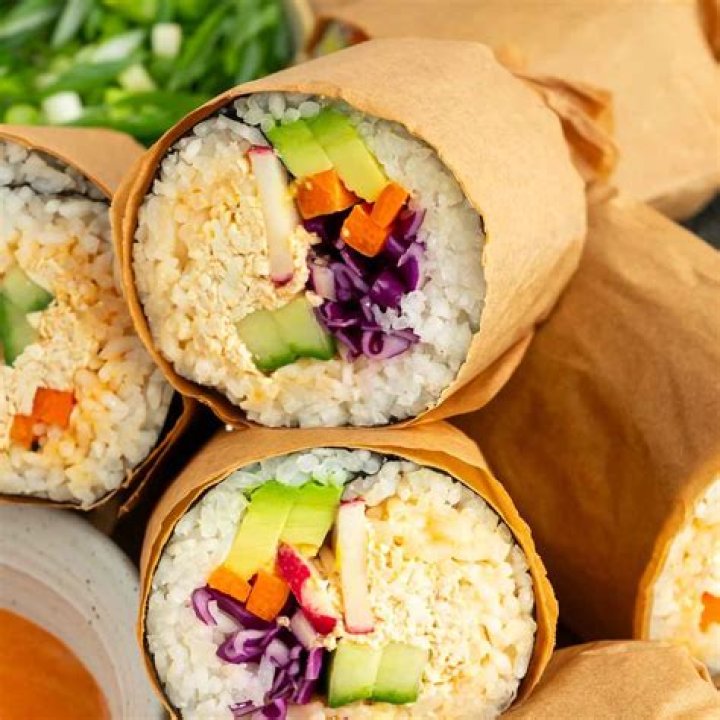
Essential Ingredients for Your DIY Sushi Burrito Bar
Stocking up for a DIY sushi burrito bar is straightforward and budget-friendly. Focus on fresh, high-quality ingredients to elevate your creative dinners. Here's a beginner's shopping list that serves 4 people:
- Nori sheets: 8-10 large sheets, the crispy seaweed wrappers that hold everything together.
- Sushi rice: 2 cups cooked and seasoned with rice vinegar, sugar, and salt for that authentic sticky texture.
- Proteins: 1 lb sushi-grade tuna or salmon (diced), cooked shrimp, or tofu for vegetarians.
- Veggies: Cucumber (julienned), avocado (sliced), carrots (shredded), and edamame for crunch and color.
- Sauces: Soy sauce, sriracha mayo, eel sauce, and ponzu for drizzling and dipping.
- Toppings: Sesame seeds, pickled ginger, wasabi, and scallions for extra flair.
These ingredients are versatile, allowing endless combinations. The DIY sushi burrito bar shines here, as it encourages experimentation—think spicy tuna with mango or veggie-packed options—making it ideal for creative dinners tailored to every palate.
Step-by-Step: Preparing Sushi Rice for DIY Sushi Burrito Bar
The heart of any great sushi burrito is perfectly seasoned rice. Don't worry—beginners can nail this in 10 minutes. Start by rinsing 1 cup of sushi rice until the water runs clear, then cook it in a rice cooker or stovetop with 1.25 cups water for 15 minutes.
While hot, mix in 2 tablespoons rice vinegar, 1 tablespoon sugar, and 1 teaspoon salt. Fan the rice to cool it slightly, creating that glossy, sticky consistency. Pro tip: Use a wooden spoon to avoid clumping. This rice base is crucial for the DIY sushi burrito bar, ensuring your creative dinners roll up neatly and taste authentic every time.
Beginner Recipe 1: Classic Tuna DIY Sushi Burrito
Ready for your first masterpiece? This classic tuna DIY sushi burrito from the DIY sushi burrito bar lineup takes just 20 minutes total. It's fresh, flavorful, and foolproof for novices.
Ingredients (1 burrito):
- 1 nori sheet
- 1/2 cup seasoned sushi rice
- 4 oz diced sushi-grade tuna
- 1/4 avocado, sliced
- 1/4 cucumber, julienned
- Sriracha mayo and sesame seeds
Instructions:
- Lay nori sheet shiny-side down on a bamboo mat. Spread rice evenly, leaving 1-inch border at the top.
- Add tuna, avocado, and cucumber in a line across the bottom third.
- Drizzle sriracha mayo and sprinkle sesame seeds.
- Roll tightly from the bottom, using the mat to seal. Wet the top border with water to stick.
- Slice in half and serve with soy sauce.
Voila! A restaurant-worthy DIY sushi burrito that's the epitome of creative dinners. Customize with extra spice for heat lovers.
Beginner Recipe 2: Veggie-Packed DIY Sushi Burrito
For a plant-based option, the veggie-packed DIY sushi burrito is a colorful, 25-minute winner. The DIY sushi burrito bar makes it easy to go meat-free while keeping things exciting.
Ingredients (1 burrito):
- 1 nori sheet
- 1/2 cup seasoned sushi rice
- 1/2 avocado, sliced
- 1/2 carrot, shredded
- 1/4 cup edamame
- Pickled ginger and ponzu sauce
Instructions:
- Prep nori and spread rice as before.
- Layer veggies in a neat row.
- Add ginger slices and a splash of ponzu.
- Roll, slice, and enjoy the fresh crunch.
This recipe highlights the DIY sushi burrito bar's versatility, proving creative dinners can be healthy and vibrant without sacrificing flavor.
Beginner Recipe 3: Spicy Shrimp DIY Sushi Burrito
Heat things up with this 22-minute spicy shrimp version. It's a crowd-pleaser straight from the DIY sushi burrito bar playbook.
Ingredients (1 burrito):
- 1 nori sheet
- 1/2 cup seasoned sushi rice
- 6-8 cooked shrimp
- 1/4 cucumber and mango, sliced
- Eel sauce and wasabi
Instructions:
- Build rice base on nori.
- Arrange shrimp, cucumber, and mango.
- Drizzle eel sauce and dot with wasabi.
- Roll firmly and cut diagonally for that Instagram-worthy look.
Perfect for date nights or family fun, this burrito embodies the creative dinners spirit of the DIY sushi burrito bar.
Tips and Tricks for Perfect DIY Sushi Burritos Every Time
Mastering the DIY sushi burrito bar is all about these pro tips:
- Keep hands wet: Dip fingers in water-vinegar mix to handle sticky rice effortlessly.
- Don't overfill: Stick to a 1-inch thick layer of fillings for easy rolling.
- Chill proteins: Cold fillings help the burrito hold shape.
- Practice rolling: Start loose, then tighten for a snug burrito.
- Make ahead: Prep stations in advance for under-30-minute assembly during dinner.
These hacks ensure your creative dinners are stress-free successes with the DIY sushi burrito bar.
Health Benefits and Nutritional Perks
DIY sushi burritos from the DIY sushi burrito bar aren't just tasty—they're nutritious. Packed with omega-3s from fish, fiber from veggies, and whole grains from rice, each burrito delivers balanced macros. Opt for brown rice or extra greens to boost antioxidants. At around 400-500 calories per serving, they're lighter than traditional burritos, supporting healthy creative dinners without guilt.
Hosting a DIY Sushi Burrito Bar Party
Turn dinner into an event! Set up your DIY sushi burrito bar with labeled bowls of ingredients. Guests build their own in minutes, fostering interaction and fun. Pair with miso soup or edamame for a full spread. This setup cements the DIY sushi burrito bar as the best for creative dinners, whether intimate or lively gatherings.
Common Mistakes to Avoid as a Beginner
Avoid soggy nori by not over-wetting, and ensure rice is warm but not hot. Use sharp knives for clean slices—run under water between cuts. With the DIY sushi burrito bar, these pitfalls are easy to sidestep, leading to pro-level results fast.
Variations for Advanced Creative Dinners
Once comfortable, experiment: Add tempura veggies, crab salad, or tropical fruits. The DIY sushi burrito bar's modular design inspires endless innovation in creative dinners.
In conclusion, the DIY sushi burrito bar revolutionizes creative dinners with its simplicity, customization, and speed— all achievable in under 30 minutes. From beginner recipes like the classic tuna to veggie delights, it's the best solution for flavorful, fun meals at home. Gather your ingredients, set up your bar, and roll into a world of delicious creativity today!
Keep Learning
